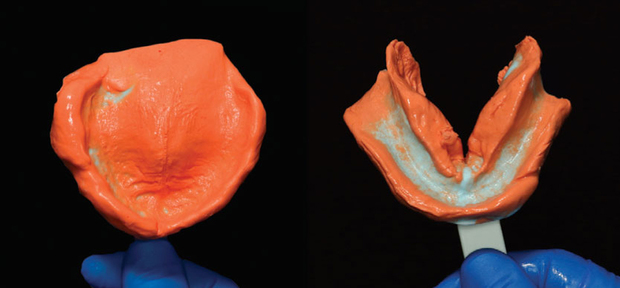
Preliminary impressions are taken using an AccuDent XD thermoplastic stock tray in conjunction with AccuDent XD impression material. You can also use Virtual XD PVS, which is more suitable for those without access to a scanner due to the dimensional stability of the material. (All three are Ivoclar Vivadent products.)
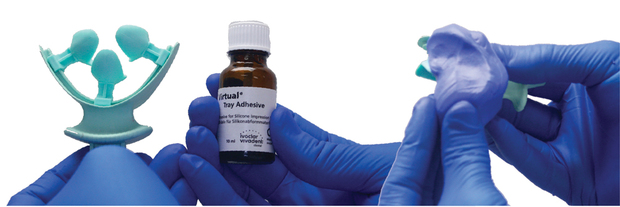
Preliminary jaw relation record is taken using the Ivoclar Vivadent Centric Tray.
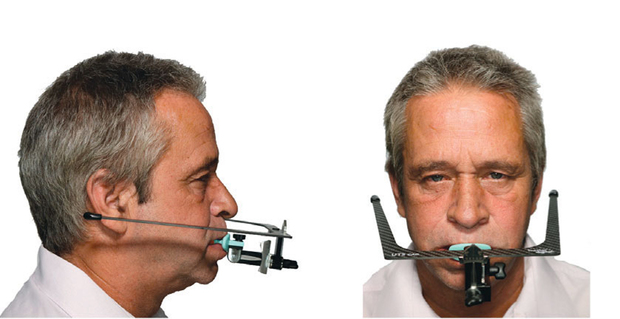
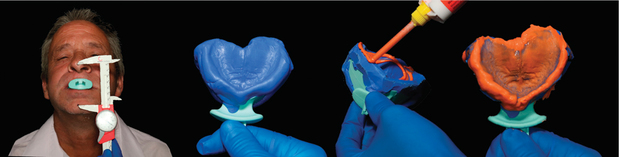
Occlusal plane: The Centric Tray is used in conjunction with the UTS CAD, a tool similar to a Fox Occlusal Plane used to capture the patient’s occlusal plane. The planes of the instrument are aligned with the patient’s Camper’s plane and the bipupillary line, and the instrument’s numeric values are recorded and transferred to the design software. The maxillary and mandibular impressions, Centric Tray bite and UTS CAD measurements are sent to the laboratory.
Laboratory Steps:

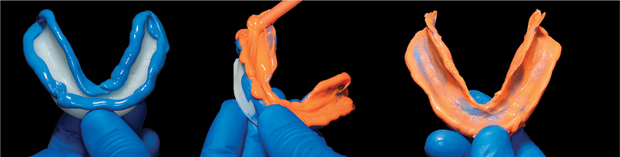
Custom Impression Trays: The maxillary and mandibular impressions and Centric Tray records are scanned with the 3Shape D900 scanner and brought into the Ivoclar Vivadent Digital Denture Professional Add-on software. The scans are merged and virtual models are displayed on the screen; the UTS CAD measurements are input into the software to orient the virtual models to the virtual UTS CAD and the patient’s Camper’s plane and bipupillary line.
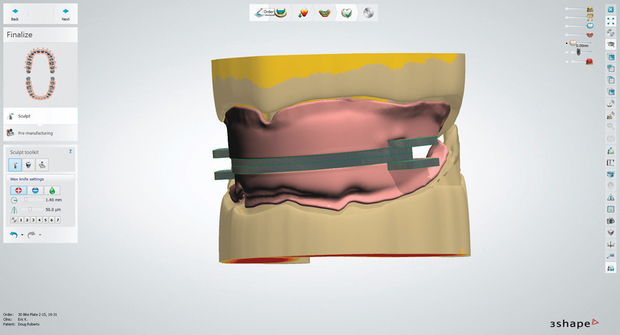
Custom closed-mouth impression trays are designed and the virtual Gnathometer CAD centric recording device is incorporated into the design of the trays.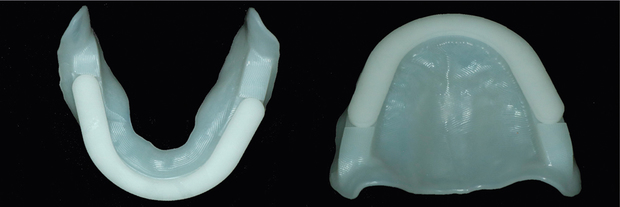
The trays are milled using the ProArt CAD Try-in Disc. These trays are designed to have a uniform relief of 2mm, allowing me to incorporate the final impression material for the functional impression that will be taken.
If preferred, wax occlusal rims can be milled using the ProArt CAD Wax Disc.
Appointment #2
Clinical Steps:
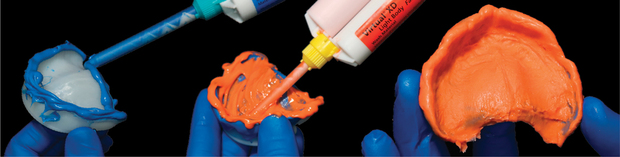
Functional impressions: Using Virtual XD PVS material, functional impressions are taken. The initial impression is done using heavy body around the borders followed by a light body wash of the entire tissue-bearing surface.
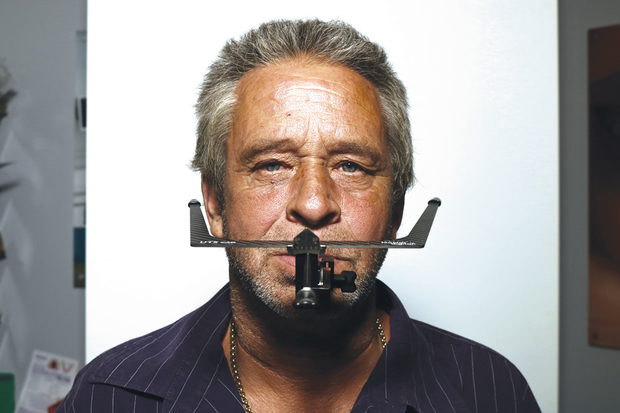
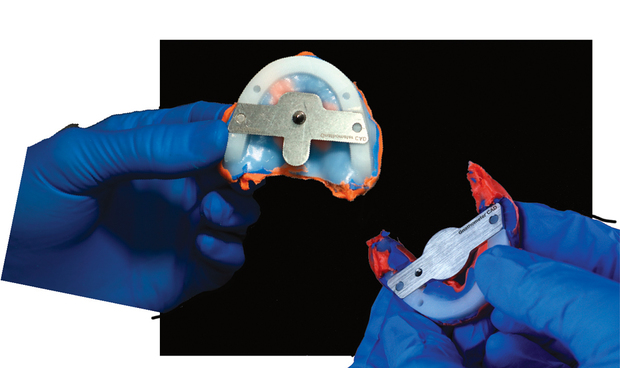
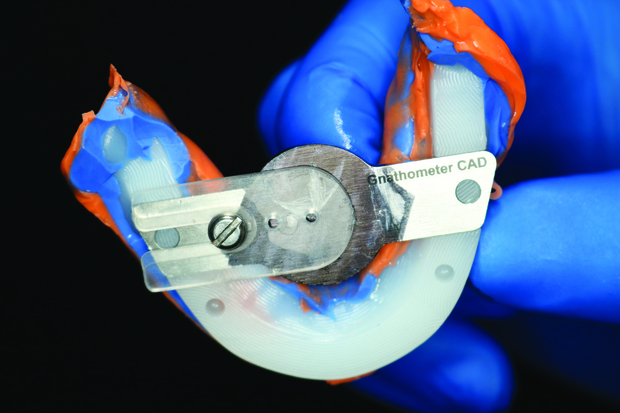
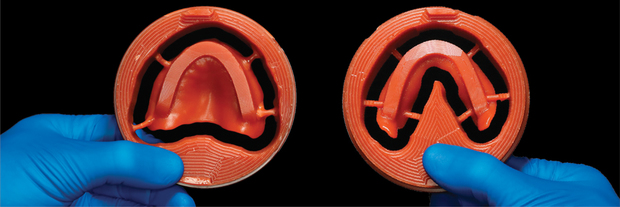
UTS CAD record and bite registration: The UTS CAD is positioned between the maxillary and mandibular trays to reconfirm the bipupillary line and Camper’s plane measurements. The UTS CAD is removed and the Gnathometer CAD components are snapped onto the trays so the bite can be taken.
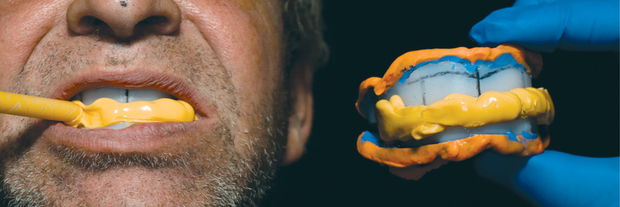
The bite registration is fixed in place by injecting Virtual Bite registration material between the upper and lower rims.
There is also the option to take the bite registration using the milled Wax Rim.
Tooth and shade selection: I selected Phonares II B82 with Phonares II Lingual.
Laboratory Steps:
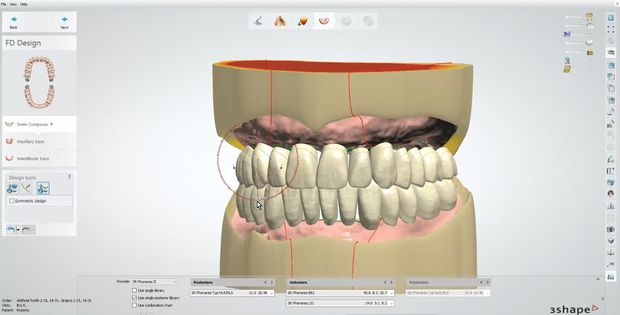
Scan and design: The final maxillary and mandibular functional impressions and centric record are scanned as one piece. The virtual models and bite registration are displayed and the UTS CAD measurements are re-entered into the software to verify the occlusal plane. The desired denture teeth and occlusal scheme are selected and all 28 teeth appear in the virtual model setup in bilateral balanced occlusion. The setup can be adjusted by moving individual teeth to create the desired esthetics.
The gingiva is placed and contoured using the wax modeling tool. I also have the ability to replicate the natural rugae and create a base thickness.
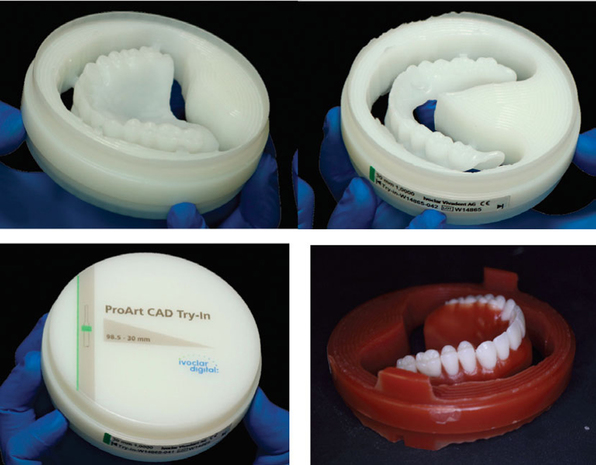
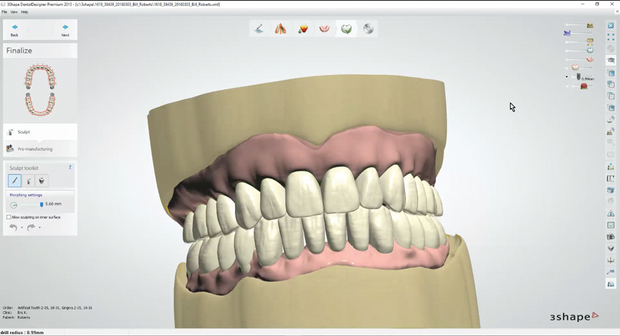
Try-in: Using the ProArt CAD Try-in disc, a fully functional monoblock try-in is milled. If a wax try-in is desired, it can be milled using the ProArt CAD Wax disc; this option also allows you to invest and process the final denture using conventional methods such as IvoBase or Ivocap injection processing.
Appointment #3
Clinical Steps:
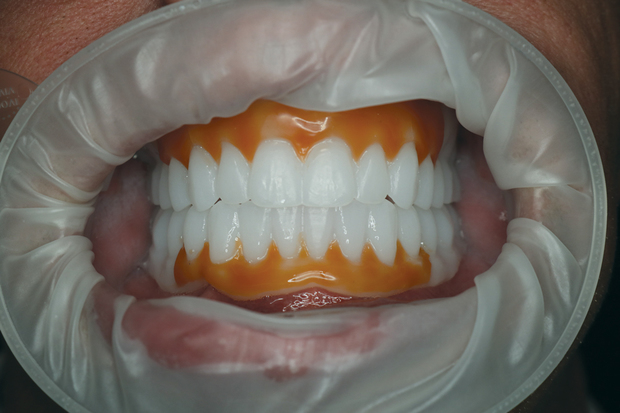
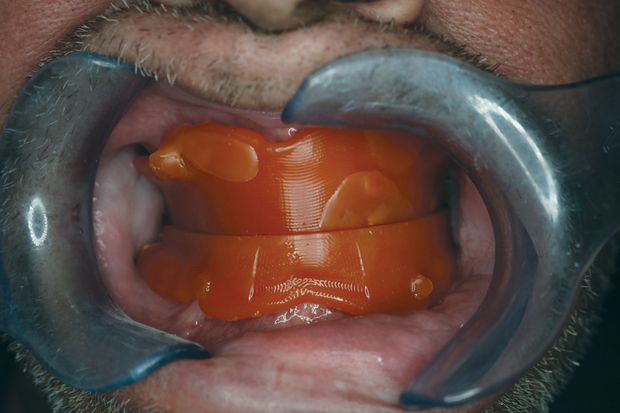
Try-in verification of esthetics and phonetics: In this case, I used a monoblock try-in. A layer of wax was added to the tissue area to differentiate the gingival margin and the apex of the tooth to facilitate patient acceptance. After getting the patient’s approval on the esthetics, function and phonetics, no modifications to the try-in are required. I then proceed to finalizing the prosthesis.
Laboratory Steps:
Milling the final denture: The software splits the final design file into two parts—the denture base and the denture teeth—and then you have two fabrication options for the final prosthesis: the oversize milling process (see "The Oversize Milling Process Renders a Virtually Monolithic Denture" below) or using pre-manufactured denture teeth, which is the process I used for this case.
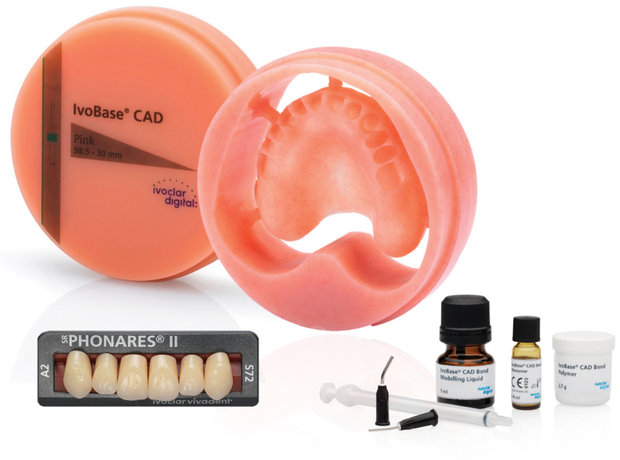
Using the IvoBase CAD disc, one side of the denture base is milled with the tooth sockets into which pre-manufactured denture teeth are individually bonded using IvoBase CAD bond. The disc is then re-inserted into the mill to finalize the intaglio and basal surface. The prosthesis is separated from the disc and the excess bonding material is cleaned with a dental handpiece and polished for delivery.
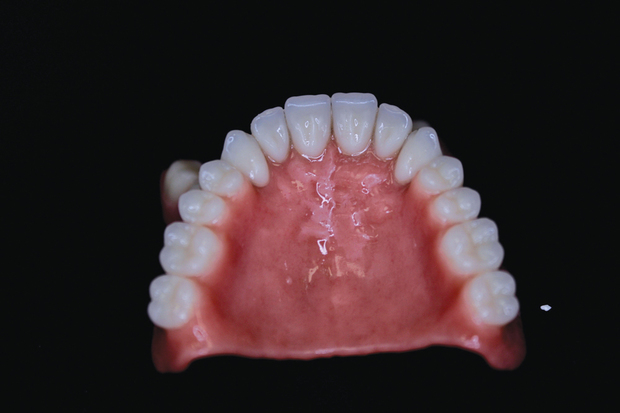
These images show the final prosthesis with a bonded tooth workflow. To enhance esthetics, the gingiva is characterized using SR Nexco.
Appointment #4
Clinical Steps:

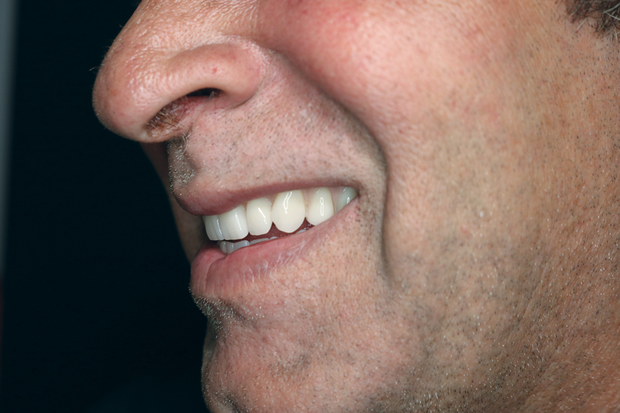
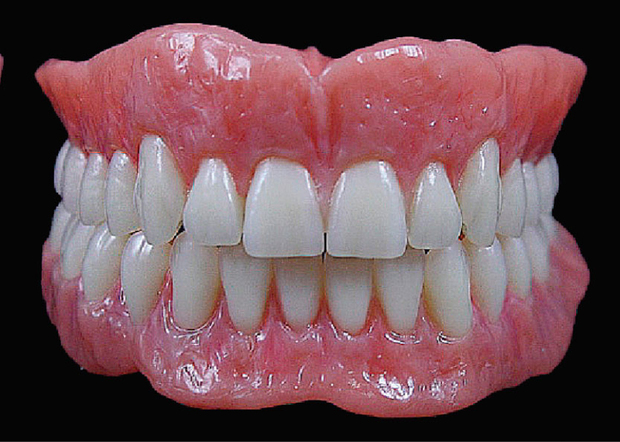
The prosthesis is delivered to the patient, at which time all centric and eccentric contacts are assessed. As you can see, the patient is very pleased with the prosthesis.
For more information about this system, call 800-533-6825 or visit ivoclarvivadent.com or ivoclardigital.com.
The Oversize Milling Process Renders a Virtually Monolithic Denture
As part of its Digital Denture System, Ivoclar Vivadent has developed a unique patent-pending method, the “Oversize Milling Process,” to mill the final denture. It incorporates a milled monolithic arch of denture teeth, reduces labor time and increases the strength of the prosthetic teeth. This workflow is also ideal in situations involving reduced interocclusal space, where the bonded teeth would typically penetrate through the intaglio drastically; immediate dentures; and both removable and fixed implant restorations.
Using the Ivoclar Digital Professional Add-on Software and a mill with Ivoclar Digital CAM V4 software, the denture base is milled from the IvoBase CAD disc to approximately 80% of its final size with the tooth sockets milled to their final precise size.
The next step is to mill the SR Vivodent CAD, a disc made of DCL (Double Cross Linked) resin-material and approved for the fabrication of permanent denture teeth.
A monolithic tooth arch is milled to approximately 80% of its final size with the tooth necks milled to their final size so the arch precisely fits into the sockets of the denture base. The tooth arch is then cut from the disc and bonded to the denture base using the Ivobase CAD Bond.
The combined tooth arch and denture base disc is milled again to final size to clean up the excess bonding material and fine tune the occlusion, creating a final denture that’s virtually monolithic.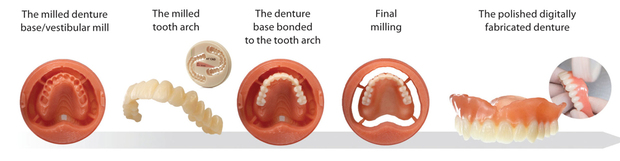
Eric Kukucka, DD, is President of The Denture Center, a network of three denture clinics in Ontario. A practicing denturist, Kukucka is a consultant and key opinion leader for Ivoclar Vivadent and Nobel Biocare, author and lecturer. He graduated from George Brown College of Applied Arts & Technology with Dean’s List Honors in 2010 and was the valedictorian of his class.
Author’s Note: Special thanks to Bill Barton, CDT, TE, Dr. Frank Lauciello and Ivoclar Vivadent for their collaboration on this case; Grant Thompson, DD, who took all the photographs; and the patient, Doug Roberts.

Article
Eric Kukucka, DD, explains the step-by-step process of restoring an edentulous patient, from initial preliminary records to the final prosthesis, using the Ivoclar Digital Denture System.

Author
EK Kukucka
Vice President at Aspen Dental Management Inc · Chicago, IL
Eric D. Kukucka is Vice President of Clinical Removable Prosthetics & Design Technologies at The Aspen Group, Chicago. As an active researcher, educator, and key opinion leader in his field, Kukucka
Subscribe to LMT Magazine. It's FREE to U.S. addresses.


February 2018
Browse all articles from the February 2018 issue of LMT Magazine
-

Mattia Brambilla
Odontotecnico at Odonto Tecnici Brambilla · Malgrate, Italy
-

Donna Johnson
Dental Technician at Aspen Dental · Fall Creek, WI
-
Phil Lam
. at . · Irving, TX
-
LAB DAY West WOWs with Camaraderie, Collaboration and Cutting-Edge Technology
LMT Communications, Inc. · Post-Show Coverage · June/July 2025
Last weekend in sunny California, more than 1,600 dental laboratory owners, managers, technicians and dentists joined LMT for LAB DAY West, the largest...
In this case study of a smile makeover for a young police officer, Lab Owner Jillian Swafford demonstrates how expertise and proper materials can bring monolithic zirconia to life.
From holograms to hyperspectral imaging, this year's International Dental Show in Cologne, Germany did not disappoint. Read our complete coverage.
Key Trends at IDS 2025: 3D Printing, Chairside Solutions and Patient Education
Kelly Fessel Carr · Publisher's Page · May 2025
Managing Editor Kim Molinaro and I had an amazing time at the IDS in Cologne, Germany, in March. Our goal—admittedly a lofty one—was to visit...
More than 60 dental professionals from 10 countries participated in Candulor’s prestigious 14th KunstZahnWerk (KZW), each fabricating an age-appropriate,...